Project Bake: Tangerine Jam


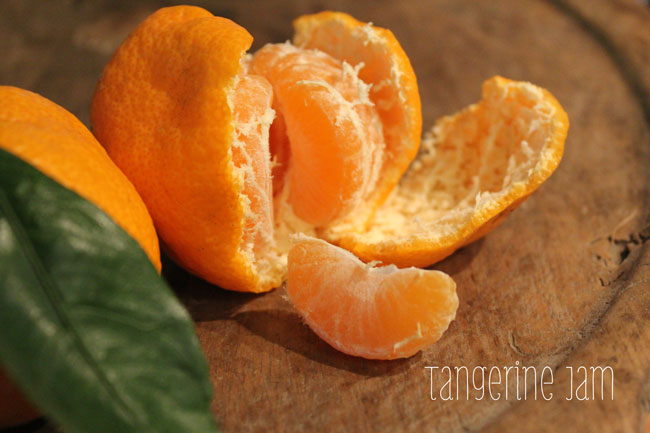
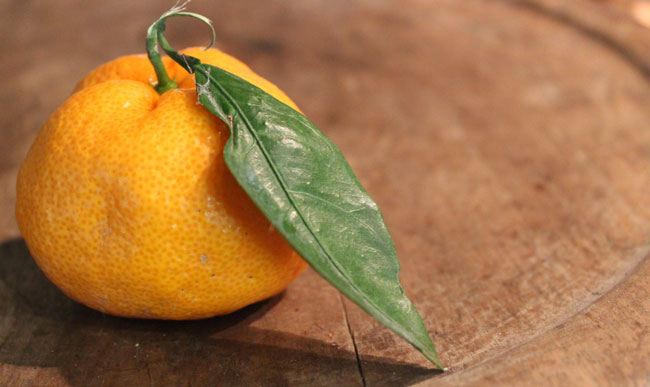
A great break in the doll-drums of winter is the appearance of tangerines! Mom's tangerines start to pop up around mid-January. She has 3 small trees so, naturally there are tangerines everywhere for about a month. We try to harvest them regularly because the squirrels {and dogs} are quite fond of gobbling them up. This year, I was brainstorming on what I can make with them and jam came to mind! Now, if anyone has made jam, jelly or marmalade before, you'll know what I mean when I say that jam is not for the faint-hearted or detail-phobic. Jam is serious business. One little mistake or a few extra seconds of boiling, and that can spell disaster for your concoction. This is something I didn't really pay attention to when I decided to embark upon my jam making adventure. I figured that, as with the majority of my baking, as long as I have a recipe, it'll come out perfect. This is not the case. Jam takes love. Lots of L.O.V.E. 

Jam making with Tangerines turned out to be quite the balancing act. 
Sugar: tangerines are naturally sweeter than other citrus, so I won't need as much sugar.
Pith: with some warning from Mom, I had to be careful of the amount of pith I was going to include. The pith (white stuff) makes jam bitter. But a little bit of bitter makes jam taste more interesting. Anyone who knows tangerines, knows that they have a LOT of pith. There was some serious amounts of scraping and peeling going on to get rid of it. I'm not a fan of bitter jam or marmalade.
Peel: part of what makes citrus jam (or marmalade) so great, is the texture of the peel. You need the peel because it contains pectin. Pectin, if you don't know, is the stuff that makes jelly gel together. Some fruit have more or less - that's why you add extra pectin (powdered or liquid) into jams. It is mostly present in the skin of fruits, especially citrus. It can be complicated because the skin (and the white) can also make the jelly bitter. To counteract bitterness from the peel & pith, I decided to scrape off much of the pith from the peel, and cut it up in small slivers. No small feat with tangerine skin being soft and delicate. {thanks, Mom, for the help on this one. Did I ever mention that she's a great sous-chef?}

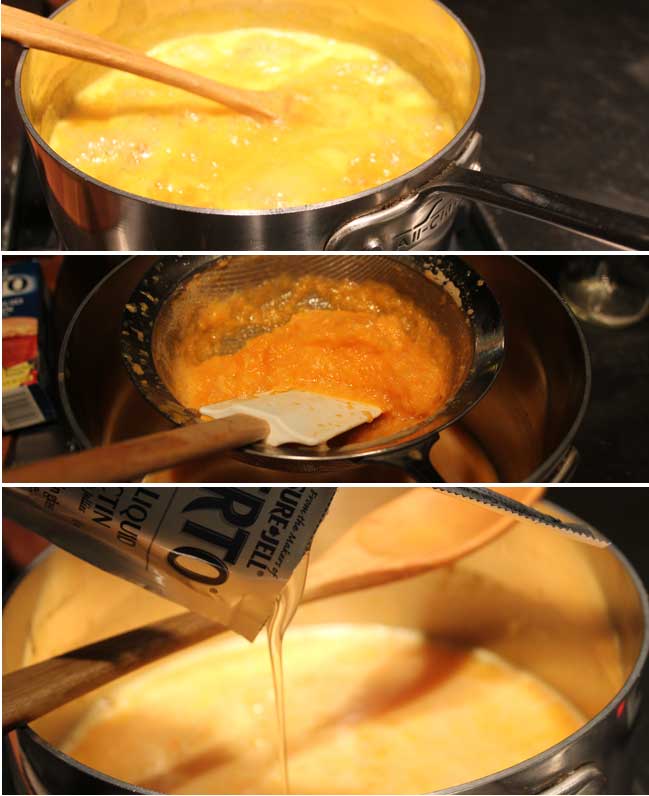
I was hoping for a mostly clear jam with chunks of whole slices and slivers of peel. So, I strained about a quarter of my tangerine pulp out because I didn't want it to be super pulpy. 
The extra pectin I used was a liquid Certo. In hindsight, next time I'll probably use a powdered pectin to see if the jam comes out a bit more solid. 


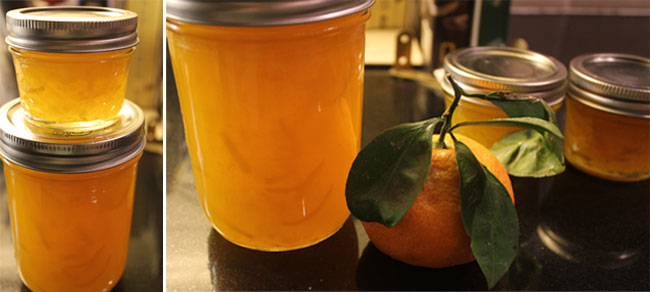
After canning it up and leaving it in the fridge for a couple of weeks {apparently, marmalade takes a little longer to firm up than other fruit jams}, I have a beautiful, sweet & delicious tangerine jam. Yay! Although exciting, the process is so labor intensive that I'll have to be seriously motivated to do it again. Or, maybe I'll just find a different recipe...

.

Project Adventure/Bake: Carmela Ice Cream


This post is kind of a dual Adventure-slash-bake project. I am an uber fan of Carmela Ice Cream here in Pasadena. And, I mean uber. In my dreams I have one of each flavor in my freezer at all times. Especially the Fleur De Sel flavor. Ohhh, man. Not only are they at a few farmer's markets in the LA area, they also have a brick-and-morter shop not too far from me.
One day, I received a notice that they were starting ice cream classes! ...Bestill my beating heart... I called up a friend and relayed the amazing news. Next thing we knew we were sitting in the shop's kitchen learning all about infusions. Too cool.
Our class was focused on creating Brown Butter Sage Ice Cream and Cranberry Orange Thyme Sorbet. Needless to say, the class was fun and informative. Carmela founders, Jessica and Zach are obviously very passionate and excited about what they are doing, and it's easy to get caught up in the many ice cream possibilities. 
As a side note: did you know that KitchenAid makes an ice cream maker attachment!?! Oh, that is so going on my wishlist.
Fun times were had by all and I know that I'm going back for more. 
Thanks Carmela for an awesome morning!

Project Bake | Dog Biscuits

Yes, homemade dog biscuits! You knew it had to come sometime, right?
So, I'm not uber on top of everything that goes in my dog's mouth, but he does get digestive issues from time to time so I have to be a bit more aware of what he eats than a lot of dog owners. Some people have to be careful because of allergies and whatnot. I found out that a lot of dog treats & chews out there have glycerin in them {it's what makes the treat chewy}. Glycerin is not something a dogs stomach can digest and can often cause digestive problems... especially if the dog eats large chunks at a time.
I'm of the general opinion, since Obie probably gets enough processed and preservative-filled ingredients through various means {kibble, medication, plastic/rubber toys, etc.}, why compound it by giving him treats that are chalk full of the stuff? Especially since dog biscuits are so darn easy to make! If you have a pup and you like to know exactly what they are eating, a super simple way to start is with treats.

I came across a collection of recipes from a post on Apartment Therapy's The Kitchn that looked pretty easy to try. So, after choosing 2 that had similar ingredients {lets face it, it was lazy grocery shopping}, I went out and picked up the ingredients and a dog bone-shaped cookie cutter {which, in hindsight was waaay too big, but is now just an excuse for me to go get another, smaller one} and got to work.
{note that the recipes I used included ingredients to which some dogs may have allergies. There are lots of dog biscuit recipes out there, find the one that is right for your pet}
Have Fun!

Read more after the jump
Recipe #1: Best of Breed

The first recipe is from King Arthur Flour. According to their blog, this recipe was a big hit with the pooches. My dog will pretty much gobble down anything you put in front of him, but if yours is a picky eater, then you might want to try these.
recipe #1 here

When the peanut butter came out, Obie tried staring me down as if to say "Give me a taste of the peanut butter, you will"

Recipe #2: Gourmet
The second recipe was from Epicurious. This one doesn't have super good-for-dogs ingredients, so if your pup has a uber-sensitive belly or you are a serious stickler for everything-healthy-for-my-dog-isms, I wouldn't really recommend it. Oh, no... sugar! Ack... butter!? Corn meal, eek! But, I'm a sucker for the fact that the comments included those stating humans liked them too... and yes, I did taste them. I'm not about to start taking them to work as a snack, but they're not too shabby!
recipe #2 here
.

Project Bake | Oreo Stuffed Chocolate Chip Cookies


I'd like to start out saying this creation is in no way my idea. Don't get me wrong, it's a brilliant idea, just not mine. I originally saw it floating around on Pinterest, and I pinned it, thinking 'hey, what a fun thing to do on a gloomy day!'. Then all of a sudden it exploded all over the blogosphere. 
The original idea is from Picky Palate (whose finished product looked better than mine, naturally).
So, one gloomy day later, I decided to give it a whirl. The original recipe called for making the cookies from scratch. Since I figured this is more of a novelty item (much like the Cherpumple disaster), I decided that in my first go-around I'd start with pre-made stuff. Lazy, I know.


It's super easy, going the pre-made route and only takes about 7 minutes to assemble. All you gotta do is lump dough on the top & bottom of the Oreo, and smush the sides together to make a solid ball. Yes, these suckers are HUGE. One note: don't let the dough get too soft, otherwise the cookies will turn out, like mine, flat with an Oreo lump in the middle. Make them and stick the pan back in the fridge for about 10 minutes. Then bake them in a pre-heated 350º oven until golden brown. Also, if you want to make an amount for a large group of people, double your recipe. I got about 9 of these from 1 package of Nestle Toll House.
Eat them warm with ice cold milk. So totally decadent.

.

Project Bake | Bacon Bourbon Caramel Popcorn

Yes, you read it right. Bacon Bourbon Caramel Popcorn. You are probably like me when I read those words, {gasp!} "No! Combining three absolutely wonderful things together in one?! It can't be possible!". Ladies and Gents, I assure you, it's for reals. At the beginning of the year, I received this recipe in my inbox via Daily Candy featuring the creation from LA's Villans Tavern. With a friend's Super Bowl Party in my future, I thought perfect! I needed to try and make this STAT. 
Now, I had never made caramel corn before, let alone a crazy fusion like this one, so I knew that I was going to have to try it out in advance of said Bowl Party.


Note: I used TJ's Apple Smoked Bacon. Don't. Don't use any flavored kind of bacon. It puts a bit of a strange taste to the popcorn. Just use plain bacon.

Click Here to read on!

Of course, I had to taste to make sure the bourbon was still good {never mind that I just bought it the day before}
Now, being the type of recipe-follower I am, I blindly went out and bought what it called for. This one called for nine bags of kernel popcorn. Nine bags. Didn't even phase me. After running out of bowls to hold the first bag of air-popped popcorn, I realized I had eight more bags to pop. Believe me, I even contemplated washing out my kitchen trash can to hold it all. Then I stood back and thought, 'Am I crazy?? How many people do they expect me to be serving? A thousand? Screw that! I'm just popping one bag.' 
So I didn't just halve the recipe, I quartered it. Much more manageable.
Oh, PS: The recipe calls for popping the corn in a pot with oil, but the air popper is much easier {and less oil/fat} and runs much less risk of burning.


Also, if you are a fan of more salty zings in your popcorn, cook a few more strips than it calls for. 
Also, cook it so that it's nice and crispy - you don't want chewy bacon in this popcorn.


After you coat the popcorn with the caramel mixture, it'll seem soggy. Don't worry, it'll dry out and harden/crystalize in the oven.
Also, spread the popcorn in a pan/sheet that has sides. You are going to be lightly mixing it every 15 minutes - sides help to keep it inside the pan instead of all over the bottom of the oven.


The popcorn is at it's best right out of the oven. Seriously, melt-in-your-mouth good. So, I would try to make it the same day as your party. Have it with a glass of milk. So yummy!

Find the original recipe here
Oh, and for the record, I decided not to make this for the Super Bowl Party. It was just too much for me to deal with when the weekend finally came. I made something entirely different and stupendous. Which, I will blog about at another time.
.

Project Bake: Boeuf Bourguignon (a la Julia Child)

"[Boeuf Bourguignon] is certainly one of the most delicious beef dishes concocted by man".
~ Julia Child
Starting right off, since this involved some oven time, I'm sort of claiming this Project Bake as redemption from the Cherpumple Disaster. Where that was an utter calamity, the Boeuf was total success.
~
I decided to cook Julia Child's Boeuf Bourguignon for Christmas Dinner. I have never cooked Boeuf Bourguignon before. Attempting to cook something for the first time for other people is a serious no-no in some cooking circles. Since it was for my immediate family, I figured they would give me a reprieve if it went horribly. But again, I was risking Christmas Dinner. Eek! 
Holy ambitious recipe, Julia! She seriously knows how to complicate a recipe. Where the same dish was a single column on the back of the beef stock carton, she took up three whole pages in her cookbook. 

There are so many little steps involved {I have to admit I skipped a couple things} in what is basically just a peasant dish of red wine-based Beef Stew! Composed of what was the cheapest/easiest to find ingredients, it had to be slow-cooked for several hours in order to make the beef tender enough to eat.

The meat and veggies we get today are, of course, much better quality, and makes a darn good dinner. Heavenly, in fact. Just make sure you set aside at least 5 hours to make it. I'm not kidding.

Some thanks to my Mom for helping out a bit {especially peeling those 20 tiny onions for me}. When all you hear is munching and sighs of happiness around the dinner table, you know you've done a good job.

Find her recipe here
.

Project Bake: Cherpumple Disaster

A week ago, I would have considered myself a pretty adept baker. 'Give me a recipe and I can make it,' I used to say. Suffice to say, I have been thoroughly humbled. I have been knocked down a few rungs by a recipe that is entirely from a box. Yes. I have failed a boxed recipe. Granted it's a very ambitious, creative, utterly rad box recipe {and I encourage all of you out there to attempt it}. I could go through all the different things we did wrong, but that would just take too long. But, I can tell you that if it ends up looking like a big pile of you-know-what, it'll still taste pretty darn good. 
{drum roll}
I give you.... 
{applause} 
The baking equivalent to the Turduken.
The Cherpumple Challenge was suggested to me by my brother, who wanted to make it for an early Thanksgiving dinner hosted by his friends. He wanted to make something utterly ridiculously awesome. So, I said, lets give it a try.

The Anatomy of a Cherpumple 
A three-layer confection consisting of:
Bottom layer: A pumpkin pie inside a spice cake
Middle layer: an apple pie inside a yellow cake
Top layer: a cherry pie inside a white cake
All smothered in cream cheese frosting
Note: the Heineken were strictly for baker hydration purposes. 
We should have noticed things were turning south when the first layer decided to erupt like Mt. Vesuvius.


Our masterpiece SHOULD have ended up like this:

INSTEAD, we got this:
See? FAIL on an EPIC scale. 
Luckily, everyone was laughing so hysterically, no one really seemed to care. 
And, yes, it tasted pretty awesome.  
Find out how to make your very own Cherpumple here
.

Project Bake: Pumpkin Seeds


After Halloween had come and gone, I had a whole load of uncarved pumpkins on my hands. When my brother asked "So, are we gonna smash some pumpkins?"... my first thought was - Yeah! But I haven't toasted any pumpkin seeds yet! How silly is that? 
So, I figured, yes it is November, but it's never too late for pumpkin seeds! So, out comes the knife and on goes the oven. 
Now, if any of you have cooked or baked with my Mother, you know that she is not the best when it comes to toasting seeds. Inevitably, she burns the first batch and has to toast a brand new batch. Apparently, on this occasion, I followed in Mom's footsteps. I burned the sh** out of them.
Yes, I could grab another one of the pumpkins and do all of this over again... naaaaaaah. I'll just munch on the crispy buggers and it'll be just fine.
.

Scenes from the Weekend

I had a great Halloween weekend. Thanks to everyone who came out to our little shindig - I hope you all had a blast!
Seriously, tho' - if and when I decide to host another party, I probably need an over-achiever monitor on my shoulder to keep me from going overboard. 
Either that or I need to have more parties so I don't try to cram all my ideas into one event.
Two things I really wanted to try were Old Lady Fingers and Boo! Cake Pops. Another thing I found later was the cute Ghostly Pretzels. Since I already had the white chocolate, I figured why not?
I definitely need to fine tune the technique {the chocolate wouldn't melt thin enough} and rethink my tool usage {I was late in purchasing the edible markers}.
But, overall, they were fun to try out.

Week(end) Bake Project: Chocolate Chip Cookies


As we all know, this weekend is Father's Day {Happy day, dad!}. I am blessed with a totally awesomely rad Dad, who doesn't really make a big deal out of, what he calls, a "Hallmark Holiday." But, at the same time, I sometimes lament that every so often, my birthday falls on or near Father's Day - and usually trumps his big day of relaxing. This is one of those weekends, where my mom is coming out to NYC for a visit {yay, mom!} for said birthday. Now, my dad may be happy about this turn of events, I'm not saying anything, but I wanted to show him a little love anyway.
Dad's a big sucker for chocolate chip cookies. The one thing that Dad asks for when I'm around, albiet very cute and bashful-like, *big grin* 'How 'bout some chocolate chip cookies?'
So, I decided to bake some cookies and send them out to California. Old reliable recipe: Nestle Toll House.
Perfect every time. Recipe after the jump.
The Original Nestle Toll House Chocolate Chip Cookies

2 1/4 cups all-purpose flour
1 teaspoon baking soda
1 teaspoon salt
1 cup (2 sticks) butter, softened
3/4 cup granulated sugar
3/4 cup packed brown sugar
1 teaspoon vanilla extract
2 large eggs
2 cups (12-oz. pkg.) NESTLÉ® TOLL HOUSE® Semi-Sweet Chocolate Morsels
1 cup chopped nuts

PREHEAT oven to 375° F.

COMBINE flour, baking soda and salt in small bowl. Beat butter, granulated sugar, brown sugar and vanilla extract in large mixer bowl until creamy. Add eggs, one at a time, beating well after each addition. Gradually beat in flour mixture. Stir in morsels and nuts. Drop by rounded tablespoon onto ungreased baking sheets.

BAKE for 9 to 11 minutes or until golden brown. Cool on baking sheets for 2 minutes; remove to wire racks to cool completely.

picture above via here

Salted Caramel Brownies 2.0

So I finally put together the recipe I originally wanted to use - adding in some caramel. It turned out great! (I always want to tweak recipes so they are a bit more personalized, but these are darn yummy from the getgo) Warning: These things are sticky gooey deliciousness!
And, I realize that I need to work on the food photography, but I figured you folks would want to see the finished product.
Recipe after the jump!
So this recipe is via Food & Wine website. Called Salted Fudge Brownies. I added a layer of caramel with Kraft's Traditional Caramel squares (found on top of the apples in produce at Food Emporium, go figure).

What you need:
1 1/2 sticks unsalted butter
2 ounces unsweetened chocolate, finely chopped
1/4 cup plus 2 tablespoons unsweetened cocoa
2 cups sugar
3 large eggs
1 1/2 teaspoons pure vanilla extract
1 cup all-purpose flour
1/2 teaspoon Maldon sea salt (or any flake salt you can find, I found it at Whole Foods)
About 3/4 cup caramel squares (prefer Kraft's Traditional, but I've also used Werther's Chewy)

What to do:
  1. Preheat the oven to 350°. Line a 9-inch square metal cake pan with foil, draping the foil over the edges. Lightly butter the foil. (I used a Pyrex glass pan, resulted in having to bake it a bit longer, but it worked)
  2. In a saucepan, add water until the bottom is just covered (about a tablespoon). Slowly melt caramel over low heat stirring constantly - you don't want it to crystalize - until melted. Set aside.
  3. In another saucepan, slowly melt butter with unsweetened chocolate over very low heat, stirring occasionally. Remove from the heat. In a separate bowl, combine the cocoa, sugar, eggs, vanilla and flour. While whisking, SLOWLY add melted butter/chocolate (especially if its still hot, you don't want to cook your eggs!) together until thoroughly incorporated. Pour about half of the batter into the prepared pan and smooth the surface. 
  4. Pour melted caramel over batter. Use as much/little as you want. Pour remaining brownie batter over the caramel and smooth surface.
  5. Sprinkle the salt evenly over the batter. Using a butter knife, swirl the salt into the batter.
  6. Bake the fudge brownies in the center of the oven for about 35 minutes, or until the edge is set but the center is still a bit soft and a toothpick inserted into the center comes out coated with a little of batter. Let the brownies cool at room temperature in the pan for 1 hour, then refrigerate just until they are firm, about 1 hour. Lift the brownies from the pan and peel off the foil. Cut the brownies into squares. Serve at room temperature.

Weekend Bake Project - Salted Caramel Brownies

I've recently had this obsession with chocolate-coated salted caramels. Perfectly sweet with a zing of salt in every other chew. **heavenly**
I've hunted them down in various places around the city and online because caramel is not something I'm about to subject my saucepans to without proper supervision (see: my mother)... One day I saw these beauties and thought that maybe this could be a weekend bake project.

So, I attempted to make these awesome little things, but neglected to use the correct recipe. And, I guesstimated about thinning the caramel down with evaporated milk (bad idea)... so, while still delicious, it wasn't quite what I was going for. I will perfect these and make the most super-amazing chocolate caramel salted brownies EVER!
...to be continued.